Product Feature
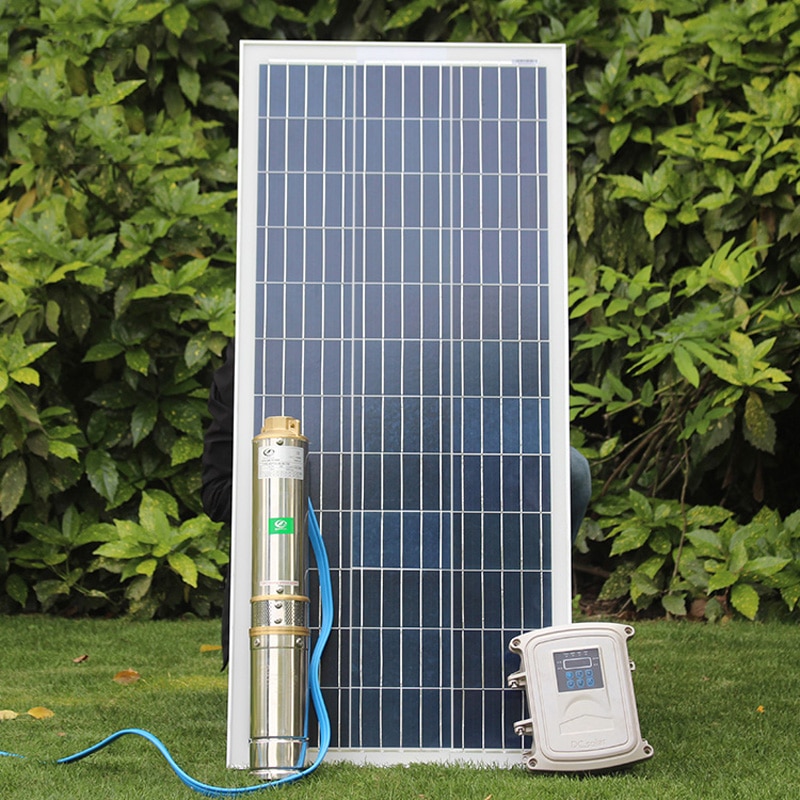
The solar water pump is widely used in deep well pump to irrigation,Village and town water supply,
Clean drinking water,Garden watering,pumping and drip irrigation etc.
1.DC Brushless motor 2.MPPT function controller
3.100% Copper wire 4.Oil cooling
5.304 Stainless steel pump body 6.Energy saving
7.Environment friendly 8.100% Testing
9.Bearing:NSK 10.Warranty:5 years
Attention:
1. The quoted price including: Pump+MPPT controller+Accesories, WITHOUT SOLAR PANELS;
2. If solar panel needed, Pls kindly let us know, we will quote accordingly (But we suggest purchasing PV panles
locally to save high courier cost, further more, big size solar panels is very fragile during delivery via express)
3. Free accessories including:
a. pump with 3meter cable b. Pump controller
c. Cable connector
d. Water level sensor e. Rope: 10meter

1. MODEL IDENTIFICATION

2. PUMP SPECIFICATION

3.OPERATING PRINCIPLE


Solar photovoltaic panels convert sunlight to electrical energy which is passed to the solar pump controller. The solar controller stabilizes the voltage and creates an output to drive the electric motor of the pump. The system can be remote from traditional power sources and fully automatic with no on-going electricity charges.
Selecting the solar panel of the pumping system
If you have not purchased a complete system from your supplier the following formulae will be useful. Your pump supplier will be able to help you with panel selection.
a. Solar PV panel (solar panel) selection:
Power of PV panels (watts) =Rated power of pump (watts) x 1. 3 ~ 1.6.
Voltage of solar panel = Rated voltage of pump (volt) x 1. 0 ~ 1.2.
The controller will already be matched to the pump by your supplier.
Eg. A 200 watt pump needs a minimum of 260 watts of PV panels to drive it (200w x 1.3 = 260w)
b. You may need combinations of panels, especially for the larger pumps. During connection of solar panels, you have to get the solar panels in series in a line to reach the rated voltage of the pump. Then get the lines mentioned in parallel to reach the rated current of the pump
Panels in parallel, add the current and the wattage of the panels
Panels in series, add the voltage and the wattage of the panels.
Eg. 2 x 12 volt 100 watt panels in parallel becomes a 12 volt 200 watt system
2 x 12 volt 100 watt panels in series becomes a 24 volt 200 watt system.
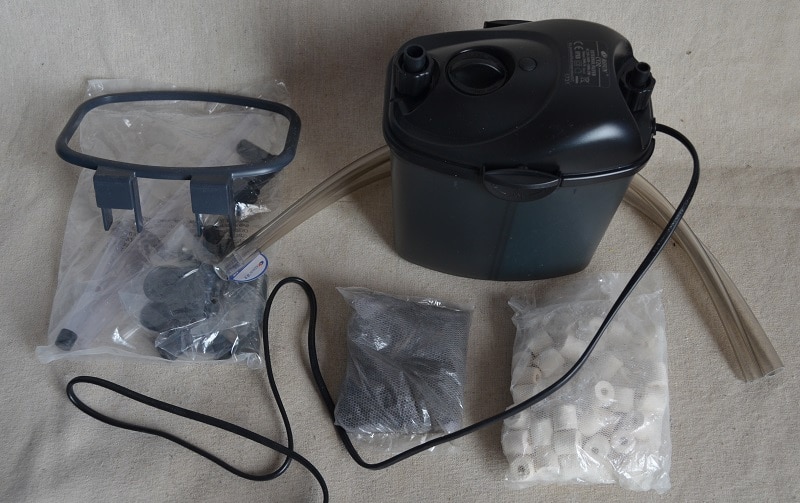
4. PAKING LIST
Open the package and check all the parts have been supplied.

5. INSTALLATION
(1) Wiring the pump
Connecting a longer cable to the pump. (cable must be at least 1.5mm2 section)
Use the parts contained in the cable connector kit (heat-shrink tube and tape) to connect a longer supply wire to the pump. If you don’t have a heat gun to shrink the tube, the barrel of your soldering iron will do or you can use a butane torch but with great care so you don’t melt the insulation or set it on fire. Bare the insulation back as shown above.
1. Layout the components needed to make the join.
2. Put the large diameter piece of heat-shrink over the main cable and then the smaller diameter pieces over the individual wires. Keep the heat-shrink back away from the joints as you solder them. Any heat transfer will prematurely shrink the heat-shrink.
3&4. Slide the small heat-shrink over the soldered joints and heat using a heat gun or alternative heat source to shrink the sleeve down over the wires.
5. Wrap the tape over the sealed joints.
6. Finally slide the large diameter heat-shrink over the completed joint and shrink to it.
Place the pump in water before you start wiring the controller box. This will allow the pump to go through the pre-conditioning required. Do not put the pump in its final position until you have tested it, unless it is easy to see and remove.


(2) Solar pump control box

① Under- voltage protection and under voltage value adjustable
In order to design a credible and steady system,the function of under voltage,over voltage ,over current and overload protection is designed in the controller.
And the under voltage value can adjust by the controller .
When input voltage lower than the set value,the system will shut down automatically.


③ Wiring the controller box
Before you start wiring the control box switch must be in the off position.
Wire the pump, panels to the control box as per the wiring diagram below. When wiring the pump do not worry about the wiring orientation, just connect the pump wires to the controller making sure they do not touch each other.
A. The wiring diagram

b. TESTING THE PUMP
Before you testing the pump, the controller box switch must be in the off position.
The pump must be under water at all times and should have been pre-conditioned for at least 15 minutes.
1. Attach a durable rope or stainless steel cable to the top of the pump using the mounting hole. Make sure the rope or cable is longer than the depth at which you want to install the pump. This is used to raise and lower the pump. Never use the power cable to do this.
2. Connect the water line and lower the pump into the bore hole, well, stream lake etc. Please note the pump must be operated vertically and avoid touching the wall , and the water should be clean with no corrosive materials in it. The pump must be at the correct depth. Do not put the pump any deeper than 20 metres in the water.
3. The PV panels need to be in full sun. Turn on the control switch. The pump has a “soft start function” and will start after 6 seconds and then spin up to full speed in the next 6 seconds. If the wiring is correct the pump will restart and the pump will run continuously. If the pump does not pump much water it is possible the connection have leakage.If this does not happen see the trouble shooting guide.
6. TROUBLE SHOOTING

7. DOS AND DON’TS
Do keep the pump under water at all times when operating
Do remove the pump if not used for a long time , wipe the water and keep it dry.
Do make sure the pump has adequate water around it during pumping.
Do put your solar PV panels in a sunny position facing true north (southern hemisphere) or true south (northern hemisphere). If the panel angle is fixed then an angle equal to your latitude will be a good compromise.
Don’t run the pump out of the water, even momentarily. It will void the warranty
Don’t adjust the regulation bolt in the base of the pump. It is factory set.
Don’t use the pump in dirty water. Premature wear will not be covered by warranty.
Don’t disassemble the control box. There are no user parts inside.
Don’t use change with other pump or control box,they are must be used as a whole set.

Limited 1 year Warranty
1. The manufacturer extends only to the original consumer purchaser a limited warranty against defects in material and workmanship for a period of one years from the date of purchase. This warranty covers the pump, controller and sensors.
2. The manufacturer or authorized factory representative will repair, or at its option replace any defective part or parts of the product free of charge. In the event of a malfunction the purchaser must return the product to an authorized dealer/agent at their expense.
3. The specified life of appliance will be valid in case the user abides by the regulations and recommendations of this operation manual.
4. A purchase receipt or invoice for proof of purchase must be presented to claim warranty.
5. All repairs not covered by warranty or outside the warranty period will be charged at normal rates.
Factory


Application
If you do not know how to choose the model,pls tell the question below,i will choose for you.
1. What is your requirements for the flow rate of the pump? that means how many cubmic meter water you need per hour.
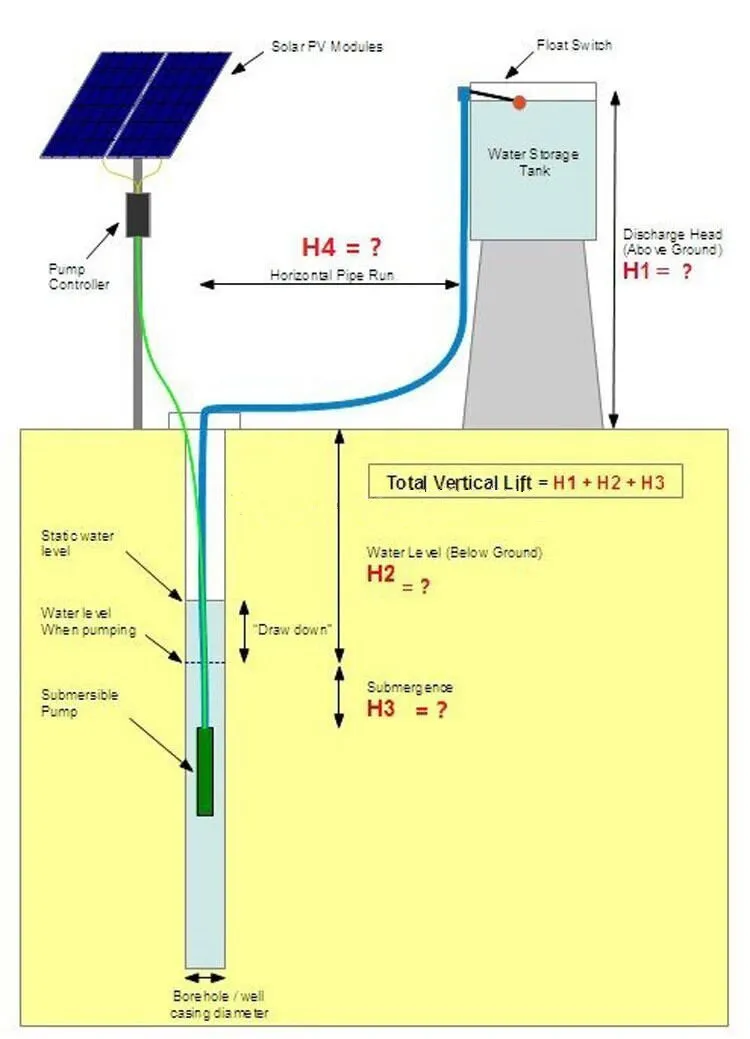
2. what is your requirements for H1 =? H2= ? H3= ? H4 = ?
Shipping

?
USD 695.00/piece
USD 635.00/piece
USD 460.00/piece
USD 555.00/piece
USD 605.00/piece
USD 510.00/piece
USD 530.00/piece
Please leave us message if any questions,we will reply ASAP.
?


 배송기간
배송기간